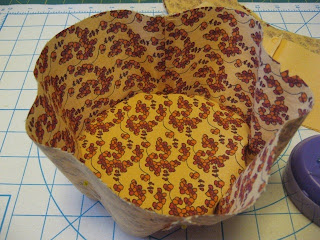
It was hard to choose which two fabrics to go with for the bucket hat, especially since the Cheep Talk collection had a lot of great designs. I finally went with a light/dark orange combination, because it made me think of the warm sunshine.
Baby Darcy is only 9-months old, but according to the pattern, her head is the size of a 3 to 5-year old! I get the feeling that I'm going to be making all of her hats because she's apparently the Bruce Bochy of the baby kingdom (for those of you non-Giants fans, the World Champions' manager has one of the largest hat sizes in the Major League)! Fortunately (or not), her body is proportionate to her head, so no, her head does not look like an orange on a toothpick.
I traced the medium-sized pattern from the free download at Oliver + S. If I haven't said so already, I really like downloadable patterns. It saves me the time of making a working copy, like I do with tissue patterns, and you don't need to make room in your sewing room, aka The Dining Room, to store it.
I jumped back and forth between working on the brim and working on the cap, mainly because I was anxious about sewing the sides to the crown of the cap. So I finished Step 1 of the cap, then went to work on the brim.
When I start a project, if I remember to, I read through the pattern directions so that I make sure that I have all the tools and equipment needed. Sometimes the pattern lists them at the beginning, but a lot of the times it assumes that you have the basic stuff. If you're just starting out, though, you might find that your definition of "basic stuff" is different from the pattern's definition of "basic stuff."
In this case, I read a few steps ahead, enough to see that in several steps, after I sew up the 1/2" seam allowance, I need to trim them down to 1/8" inch. I traced where I'd sew the 1/2" seam, and then also marked how far I would have to trim. It just saves me some time later since I am already marking the 1/2" seam.
After turning the brim right side out, I added rows of topstitching. The brim already has some interfacing and would have worked just fine without it, but the rows do make it a little stiffer. Besides, I like the way it looks.
Now it was time to work on the cap. First I would have to pin the crown to the side panels, but again I read a few steps ahead and saw that I would need to clip into the cap's seam allowance and then sew the pieces together with a 1/2" seam. Instead, I marked the 1/2" seam on the cap and clipped it before attaching it to the side panels. That way I don't accidentally clip the side panels while the pieces are sewn together.
The reason for my procrastination was because of a forum post on the Oliver + S website where someone had problems fitting the sides to the crown. I'm still not completely cool with sewing curves and circles, so of course I attributed her issues to the curves. If that wasn't enough, most of the suggestions said to pin, pin, and pin some more! I don't LIKE pinning!
A reply from the pattern's designer gave me an idea about how to sew the pieces together, and amazingly, it took ONLY FOUR PINS! Hooray!
What I did was pin at the matched seams and notches. Then, following Liesl's prompt, I ran a basting stitch at those four points, but only for about an inch to 1 1/2" long. Next, I picked a midway point between two of the basting stitches, and ran a short basting stitch there. Then, I went to the opposite side of the circle and ran another stitch there. I sewed again at the midway point between the other two original basting stitches and then to its opposite point, and continued this pattern on the circle until the entire crown was attached
I don't know if there is a name to this method, but when The Husband saw what I was doing, he said, "Oh, that's how you install lug nuts on a tire." So, until I find out what it's really called, I'm going to call it it "The Lugnut Method."
The Lugnut Method creates a lot of thread ends, but it avoids using a lot of pins. Another reason why I went with this method instead of sewing around the circle with one long stitch is that it minimizes the amount of puckering.
After I checked out the shape of the cap, I went back and stitched at the 1/2" seam. Looks good!
By the way, when you sew on your basting stitch, don't place it where you'll sew the finished stitch. Otherwise, you'll spend a lot of time trying to pull out the basting stitches while somehow avoiding the finished stitches. It took me a few frustrating projects to realize that on my own. Then I read a little bit about basting stitches, and apparently placing the stitch slightly away from where the finished stitch will go is part of the basting stitch method. Oh. Wish I knew that before.


No comments:
Post a Comment