The day has finally arrived. The day I had been avoiding all week. Yup, today is the day I finish up the berries with hand sewing.
For finishing up the berry, The Purl Bee listed a cotton embroidery floss that was a size 12 thread. All I had on hand was DMC embroidery floss, which comes in six strands that are each size 25. I don't know much about embroidery floss, and even less about floss sizes, but apparently the higher the number, the thinner the thread size.

I don't use embroidery floss that much, so I didn't know if there were
special tools or rules or anything when using them. I just figured one
of the needles from my Clover embroidery needle set would do the trick,
so I picked one at random and grabbed one of the green skeins of floss. I must be
honest and tell you that I spent some time figuring out how to get the
thread I needed to sew up the berries.

The DMC floss is one continuous length nearly 9 yards long. Do I use the entire length or do I cut a certain amount? Should I separate the threads, or use all six? Will the threads be strong enough to sew up my berries? I wasn't able to find a conversion table for the thread, so I decided to use two of the size 25 strands, and nearly a yard in length, and hoped that they would be able to do the job that one size 12 would do.
I didn't know it at the time, but apparently there is a method to separating strands from the floss. I tried pulling out two strands at a time, but the whole thing got all tangled.

I tried with a short length of floss, but again, they got tangled. It was frustrating, and I couldn't figure out how to get the strands that I wanted. Then I read that you are supposed to pull the strands out one a time to avoid tangles. I couldn't believe that it was that simple, but I tried it, and it worked! Amazing!
So I started gathering and stitching the opposite corners of my berry, berry stuffed berries.

So I started gathering and stitching the opposite corners of my berry, berry stuffed berries.

It was easy at first, and the two strands were holding the stuffing in quite well. The more I gathered, though,the more difficult it was to sew the opposite corners together.
You know those old movies where two women are in their corsets and petticoats, and one of them is hugging a bedpost while the other is trying to cinch the corset as tight as possible, so tight that she is pushing against the wall for more leverage? That's what it started to be like for my first berry.

You know those old movies where two women are in their corsets and petticoats, and one of them is hugging a bedpost while the other is trying to cinch the corset as tight as possible, so tight that she is pushing against the wall for more leverage? That's what it started to be like for my first berry.

I sat on it to compress the fiberfill, which worked well enough to finish up the berry. For the second berry I decided to remove some of the fiberfill, and it ended up being a lot easier to close up.


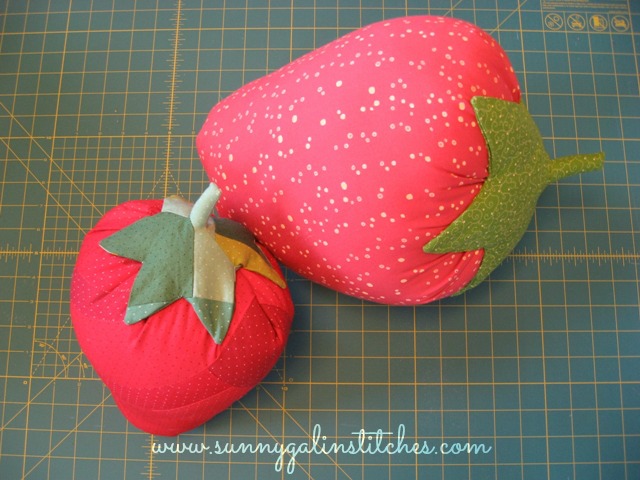
I was really liking how my berries were turning out! Of course The Husband, with his unique perspective, said that they were cute, too, but that the dotted strawberry looked moldy. Actually, his exact words were, "That's one moldy-a** strawberry!" Sigh.
Now it was time to add the stems to the tops of the strawberries.

Now it was time to add the stems to the tops of the strawberries.

Again I used two strands of the floss and started the stitching on a spot on the strawberry that would be covered by one of the leaves.

I don't know what this stitch is called, but it's almost a cross between a running stitch and a blind stitch. I'd go back and forth between the stem and the strawberry, running the needle through the stem about inch, then through the berry about 1/4". At first I would pull the thread tight after every stitch, but then I found it was easier and faster to leave the stem slightly loose from the berry while running the stitches,

and then pull the thread taut once I reached the end of that side of each leaf.

Six leaves later and I've got two juicy strawberry pillows! Hooray!
No comments:
Post a Comment